Understanding bridge & swap in crypto
In DeFi, bridging and swapping are the two keys that unlock entire new ecosystems. Imagine you're holding tokens on Ethereum, but you spot a better trading pair or deeper liquidity over on Polygon or Arbitrum. Without a bridge, those opportunities stay locked behind chain walls.
A bridge lets you move assets across blockchains, while a swap converts one token into another once you're there. Put together, bridge + swap is your passport to the full multichain economy.
Why does this matter?
-
Access more markets: By bridging, you tap into the full range of DEXs and liquidity pools available on new chains. That often means better prices, tighter spreads, or unique trading pairs you won't find at home.
-
Optimize for cost and speed: Not all bridges and DEXs are built the same. Some prioritize the lowest fees, others the fastest confirmation times, and some emphasize security above all else. As a trader, you get to choose the mix that matters most to you.
-
Stay flexible: With bridge + swap, you're not tied to a single chain. You can explore where yields are highest, liquidity is deepest, or new opportunities are emerging.
In this post, we'll walk through how bridge + swap works, how it compares to all-in-one cross-chain swaps, and the key factors - like security, fees, and flexibility - you'll want to keep in mind when moving assets across the multichain universe.
Key concepts: bridging and swapping
At its core, a bridge + swap process is about exchanging one currency on one blockchain for a different currency on another blockchain. To make that happen, you usually need two steps:
-
Bridge - move your token from Chain A to Chain B.
-
Swap - trade that token for the one you actually want to use.
Think of it like international travel: the bridge is your flight between countries, and the swap is you exchanging dollars for euros once you land.
Bridge
Bridging means transferring the same token across blockchains.
- Example: USDT (Ethereum) → USDT (Arbitrum).
You still hold USDT, but it now "lives" on a different chain, ready to be used in that ecosystem.
Swap
Swapping is about exchanging one token for another.
- Example: ETH → USDC (on Ethereum).
Most swaps happen on the same chain, but cross-chain swaps can combine bridging and swapping into a single step.
Together, bridging and swapping give you flexibility: move your tokens where you need them, then trade into the asset that works best for your strategy.
Crypto bridges explained
Blockchains are like islands: each with its own rules, assets, and communities. By default, they don't talk to each other. That's where bridges come in.
A bridge is a protocol that lets you transfer digital assets from one blockchain to another. Without it, moving ETH from Ethereum to Optimism, or onto Solana, would be impossible.
Bridges solve a fundamental problem in blockchain technology: the lack of native interoperability. They act as the connectors between otherwise isolated networks, making the multichain world actually usable.
Why do they matter?
-
Access to ecosystems: With a bridge, your ETH on Ethereum can become ETH on Optimism, opening the door to new apps, lower fees, or different liquidity.
-
Scaling with L2s: As Layer 2s like Arbitrum and Optimism have grown, bridges have become the gateways that move assets between the security of Ethereum and the speed of its scaling solutions.
-
Cross-chain expansion: With dozens of Layer 1s now active (Solana, Avalanche, BNB Chain, etc.), bridges are the plumbing that keeps liquidity flowing across the multichain economy.
In short: bridges aren't just a convenience - they're essential infrastructure. They make it possible for assets, and the users holding them, to move freely between chains.
How bridges work
So what actually happens when you use a bridge? At a high level, the process looks like this:
-
Lock or burn on the source chain - The tokens you're sending (say, USDC on Ethereum) are either locked in a smart contract or burned so they can't be spent twice.
-
Mint on the destination chain - The bridge then issues equivalent tokens on the new chain (USDC on Optimism, in this example). These are often called wrapped or synthetic tokens.
-
Reverse when you go back - If you want to return your funds to the original chain, the process is reversed: your wrapped tokens are burned on Optimism, and the original USDC is released back on Ethereum.
Example: Moving USDC from Ethereum to Optimism. The bridge locks your USDC on Ethereum and mints an equivalent amount of USDC on Optimism. Those Optimism-based tokens represent your claim to the originals locked away on Ethereum.
In short, bridges don't "teleport" tokens across chains - they lock in one place and mint in another. This ensures the total supply of the asset stays consistent across chains.
Example: a crypto bridge & swap with Ethereum
Let's put it all together with a real scenario. Imagine you hold 1,000 USDT on Ethereum, but you want to end up with 500 MATIC tokens on Polygon. To get there, you'll need both a bridge and a swap.
Step 1: Bridge USDT from Ethereum to Polygon
-
Connect your wallet to a bridge platform.
-
Select source chain: Ethereum and destination chain: Polygon.
-
Enter the amount: 1,000 USDT.
-
Approve and pay Ethereum gas fees.
-
The bridge locks your USDT on Ethereum and mints an equivalent amount on Polygon.
-
Wait for confirmation (usually 5-15 minutes).
At this point, you now hold 1,000 USDT on Polygon instead of Ethereum.
Step 2: Swap USDT for MATIC on Polygon
-
Head to a Polygon DEX (like CoW Swap or SushiSwap).
-
Connect your wallet (it will now show USDT on Polygon).
-
Select the pair: USDT → MATIC.
-
Enter the amount: 1,000 USDT.
-
Review the exchange rate and set your slippage tolerance.
-
Pay Polygon gas fees (typically just $0.01-0.10 in MATIC).
-
Execute the swap and receive roughly 500 MATIC tokens.
The takeaway
Bridging moves your tokens to the right chain. Swapping converts them into the asset you actually want. Together, they give you the flexibility to move value across blockchains and access new opportunities wherever they arise.
The pros and cons of a bridge & swap approach
The bridge + swap method gives you maximum flexibility: you can move assets between blockchains and then exchange them into the token you actually want. But like most things in DeFi, it comes with both benefits and trade-offs.
Pros
-
Choice & flexibility: Pick the bridge and the DEX that best match your priorities: lowest fees, strongest security, or deepest liquidity.
-
Transparent costs: Each step shows its own fees (bridge, gas, swap), so you always know what you're paying for.
-
Recovery options: If one step fails, you often still have a path to recover your assets or complete the process manually.
-
Access to liquidity: Once bridged, you unlock all the DEXs and pools on the destination chain, giving you maximum market reach.
Cons
-
Two steps, more effort: Bridging and swapping are separate transactions. You'll need to monitor each carefully and sometimes wait in between.
-
Double the fees: You pay for gas on the bridge and on the swap, which can add up.
-
More moving parts: Each extra step introduces risks, like bridge downtime, failed transactions, or running out of gas.
-
Higher UX complexity: Switching between bridge interfaces and DEX UIs can feel clunky and increases the chance of user error.
-
Stranded assets risk: If something breaks mid-process, tokens can end up stuck on an intermediate chain and require manual recovery.
The takeaway
Bridge + swap gives you control and flexibility, but it also means more responsibility. If you're confident in managing each step, you can optimize for the best execution. If you prefer simplicity, you might lean toward one-step solutions like cross-chain swaps (which we'll cover later).
The strengths of a bridge & swap approach
A two-step bridge + swap process isn't just extra work - it also unlocks real advantages for traders who want control and flexibility.
-
Flexible routing: You're free to mix and match. Choose the bridge with the strongest security guarantees, then pair it with the DEX that offers the best liquidity or lowest fees.
-
Clear fee visibility: Every cost is broken out-bridge fees, gas on both chains, swap fees-so you know exactly what you're paying at each step.
-
Recovery options: If something goes wrong, you're not stuck. Because the process is modular, you can often recover assets or manually complete the remaining step.
-
Independent platform choice: You're not tied to a single provider. That means you can optimize for security on one side and price efficiency on the other.
-
Deeper liquidity access: Once your tokens arrive on the destination chain, you unlock the full range of DEXs and liquidity pools there-maximizing your trading options.
In short: bridge + swap gives you freedom, transparency, and control-qualities that experienced traders often value more than pure convenience.
The limits of a bridge & swap approach
While bridge + swap gives you freedom, it also introduces friction and risk that traders need to keep in mind.
-
Manual coordination: You can't do it all in one click. First you bridge, then you swap-each step requiring your attention and careful timing.
-
Time exposure: The full process can stretch 15-30 minutes. In fast-moving markets, that window leaves you vulnerable to price swings.
-
Double gas costs: You'll pay once to bridge and again to swap. On chains like Ethereum, that can quickly eat into profits.
-
More failure points: Two steps mean twice the chance of something going wrong-bridge downtime, insufficient gas, or failed transactions.
-
Platform switching: Jumping between bridge interfaces and DEX platforms adds complexity and increases the chance of user error.
-
Timing risks: Even if both steps succeed, prices can shift between the bridge and the swap, leaving you with worse rates than expected.
-
Stranded assets: In the worst cases, technical issues or congestion can leave your tokens stuck on an intermediate chain with no easy path back.
The trade-off is clear: bridge + swap puts more control in your hands, but also more responsibility.
Cross-chain swap: a streamlined alternative
If bridge + swap feels like juggling tabs and gas fees, cross-chain swaps are the minimalist alternative. Instead of two separate steps, everything happens in one seamless transaction: your assets jump chains and change tokens in the same move.
How cross-chain swaps work
Cross-chain swaps run as a single atomic transaction - meaning it only executes if every step succeeds. If one part fails, the whole thing reverts, keeping your funds safe.
Here's how it plays out:
-
Connect & choose tokens: Select your input token (e.g. USDT on Arbitrum) and your output token (e.g. ETH on Base). Confirm the amount.
-
Protocol takes over: It locks your USDT on Arbitrum, handles the bridging automatically, and finds the best swap rate via DEX aggregation.
-
Receive your output token: The protocol delivers ETH directly to your wallet on Base.
The result? No juggling bridge + DEX, no monitoring confirmations, no timing stress. Everything-slippage management, routing, execution-gets handled under the hood by the protocol.
Do you want to do a cross-chain swap? Well you can in CoW Swap! We're tackling the core frustrations of cross-chain DeFi head-on, delivering a solution that's not only convenient but also inherently more secure and efficient.
What Makes CoW Protocol's Cross-chain Swaps Special?
While others might offer cross-chain solutions, CoW Swap brings its signature user-protective magic to the bridging experience. Here's why this launch is a cut above the rest:
All-in-One Convenience: This is the core promise. You can now swap and bridge in a single transaction, staying within the familiar CoW Swap interface. It saves you clicks, time, and precious brainpower that would otherwise be spent bridging manually.
Trusted Bridge Integrations: We launched with Bungee as our first integrated bridge provider, but we have other partners in the pipeline. Launching with Bungee ensures that your cross-chain transfers are powered by reputable and secure infrastructure, mitigating the security risks often associated with bridges.
Future-Ready Composability: This feature is built for the future of DeFi. It lays the groundwork for advanced workflows and composability, allowing for even more complex and efficient cross-chain strategies down the line. Think about pairing swaps with any on-chain action, like claiming staking rewards and rebalancing your portfolio in one go.
Next steps
Want to learn more? Check these articles that help explain Bridge and Swap more clearly
Ready to start cross-chain swapping? Step right this way.
FAQs for crypto bridges and swaps
What is the difference between a bridge and a swap?
A bridge moves the same token between different blockchains (like USDT from Ethereum to Arbitrum). A swap exchanges one token for another, typically on the same blockchain (like ETH for USDC on Ethereum).
How do crypto bridges work?
Bridges lock or burn your original tokens on the source chain and mint equivalent tokens on the destination chain. When returning to the original chain, the process reverses. These wrapped tokens represent your original assets on the new blockchain.
Are crypto bridges safe to use?
Leading bridge platforms prioritize security through regular audits, non-custodial operations, and smart contract safety measures. However, bridges remain targets for hackers. Always use reputable platforms and verify transaction details carefully.
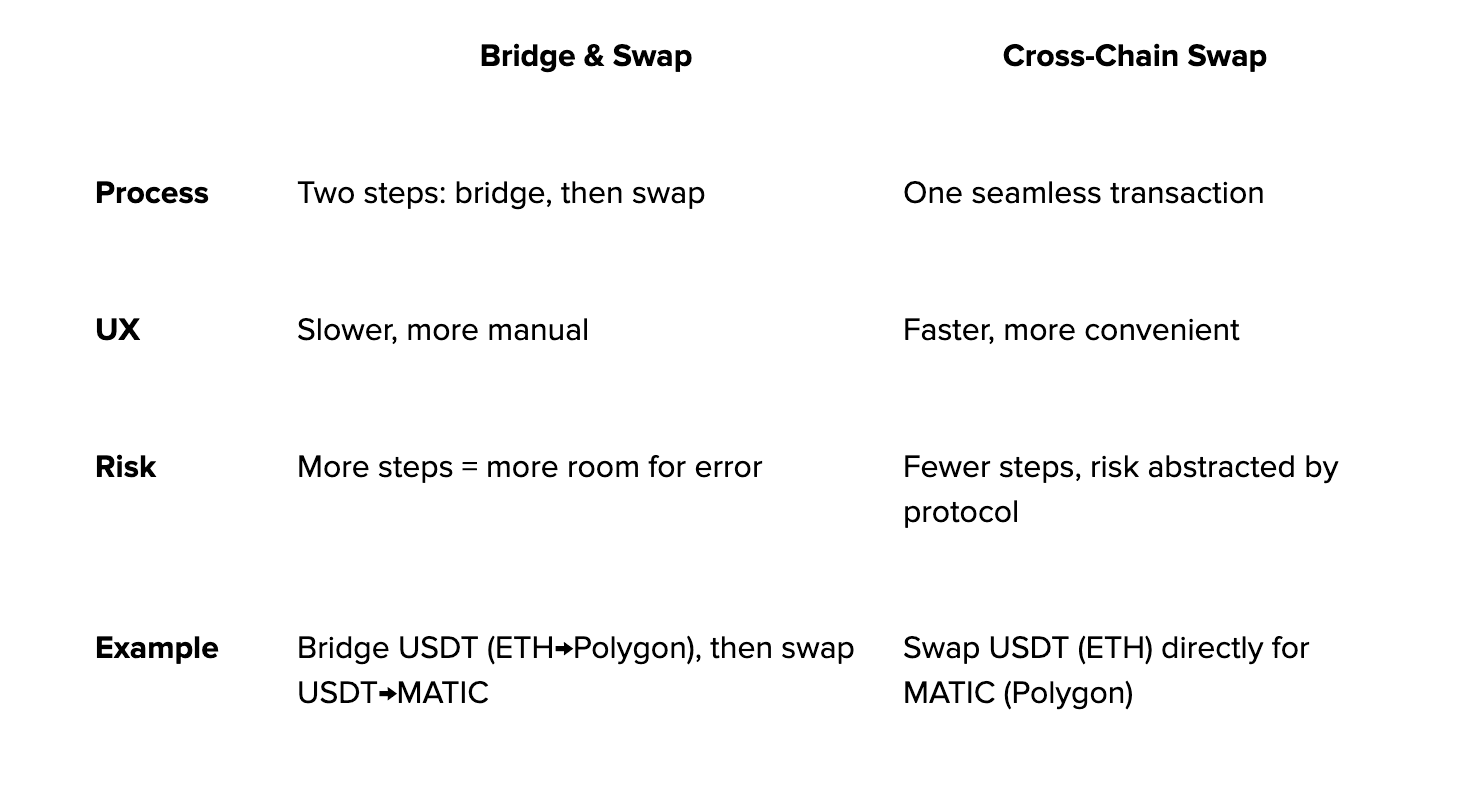
What's the difference between bridge & swap and cross-chain swap?
Bridge & swap is a two-step process (bridge, then swap) that's slower but more manual. Cross-chain swap is one seamless transaction that's faster and more convenient, with fewer steps and risk abstracted by the protocol.
Can I bridge between any two blockchains?
Not all blockchains are directly connected. Popular bridges like Symbiosis support 45+ networks including EVM and non-EVM chains, while Rubic supports 100+ blockchains. Check your chosen platform's supported networks.

